


PS if ever there was an over usage of the homophone "two-to-too" I gotcha covered ^

I will usually hole-punch the answer key and keep it with the task card set. I love this because I can pull the set out to use again and again and I don't have to search for the file on my computer or the answer key in my "master" binder. And I'm all for saving time folks.


A lot of times teachers will ask TpT sellers to make/include a cover that is the same size as the rest of the task cards. With this trick, you simply manipulate your print settings to do the job for you! I'm using Adobe Reader here, but the trick works with Preview on a Mac as well. (Adobe tends to give me fewer printing issues with TpT PDFs). This tutorial assumes that the file you have has 4 task cards on each page in landscape orientation.
First, you'll want to identify which pages you'll want to print as a reduced or 1/4-sized image. My cover page is on page 1, and my answer key is on page 13, so I will be printing these two pages. You can find this information in a box that looks like this along the top ribbon of your screen:

Second, open your printing options, usually by going to File>Print or by pressing CTRL+P (or CMD+P if you're using a Mac).
Third, you want to tell the computer/printer which pages you want to print. Since I only want to shrink my cover and answer key pages, I'm telling it to print pages 1 and 13 (1, 13).

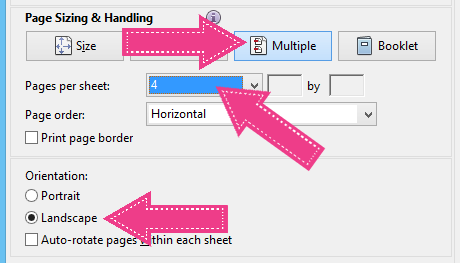
Fourth, make these selections. I want 4 pages per sheet because my task cards are 4 per sheet. You can change this if you're making mini-sets of task cards, which you'll see in my next post :) I want my paper to print in Landscape orientation. Again, depending on the format of the task cards you purchased, this may change. Check the preview before printing :)
Fifth and lastly, check the little preview box to make sure it's going to look like you want! If you're printing lots of pages, you may need to toggle on those arrows under the preview to see how they look on the next pages. When you're satisfied, go ahead and press print!

This is a GREAT way to keep your task cards more organized because the cover is identical to the one provided in the file. Most sellers have the CCSS standard printed on it which makes your life all the easier.
Past Task Card Series Posts:
No comments:
Post a Comment